Showing posts with label project playroom. Show all posts

6.13.2013

{Project Playroom} Even More Progress

The playroom is quickly becoming my favorite room in the house. Each time we make an update, it gets a little more personality and function. If you've been following along since the beginning, you already know that this room needs to work super hard for us: it's a play space, a guest room, and my new office.

Here's how the space is looking now...
(please note I had just gone on a huge toy purge and put a lot of the baby toys in the attic... and wiped down the chalkboard... the room looked like this for about 10 minutes until A woke up from his nap!)


I recently changed out the bedding for this adorable black & white polka dot sheet from Target. The old comforter was always a mess, and was hiding the pallet day-bed that C made a few years ago. Now that we have just a sheet on there, the room seems so much more open (and of course, it made way for more matchbox cars!)

The art wall is still a big hit, and gets used almost every day. I think what A loves most about this wall is that there are 'no rules' - he can draw anywhere, and pretty much do anything. Hey - that's important when you're 2!


The stairway art was C's birthday gift back in February. I had secretly stolen his collection of tickets (sporting events & concerts) that he had been collecting since his toddler years, and made them into collages. We also added C's grandfather's fire helmet to the room, which is a deeply sentimental item for my husband, and something he looks forward to sharing with A as he gets older.


I haven't made much progress in the toy area, other then adding another basket on the bottom. Still looking for the perfect sized baskets for the second shelf that will withstand my wild child, and won't damage the shelves from being pulled on & off everyday.

Here was my 'wish list' when we started this room back in January...

Playspace:
find a new, plush (kid-friendly) rug
add an additional large basket for toy storage
• replace blue bins on 2nd shelf
• child proof TV with anti-tip brackets
create an art area (maybe a chalkboard & a rotating gallery for A's artwork)
add a gate at the top of the stairs
• find a way to keep toys organized, and easy-to-find

Office:
create/build a two-person desk in the dormer
add shelving for storage
make a functional/fun message station for reminders & invitations
find 2 desk chairs
• create a functional filing system for household paperwork

Guest Space:
• add wall-mounted sconces near the bed
update bedding
• add throw pillows along wall

Also...
add/make window treatments
• build a closet door for small storage space
• add a closet rod to small space for off-season jackets
add artwork to stairway

Still a bit more work to do, but we've made so much progress!

You can see the other Project Playroom posts, here:
Current Playroom
Inspiration
The New Rug
DIY Fabric Covered Cork Board
Progress + New Desk
Art Wall
New Chair + Progress

5.13.2013

{Project Playroom}: A New Chair + Progress

Happy Monday! Hope you all had a wonderful weekend, and for all you mommies, I hope you were spoiled rotten and spent the day enjoying your littles. We had a great weekend, full of family time and sunshine. There were a few tantrums, too, but the sweet smiles and kisses I got on Sunday made up for all the times I said "don't make me count to three!"

:)

Wanted to share my new office chair, from none other than Habitat ReStore! I had always heard great things about this place, so when they were throwing a huge sale last weekend, we decided to check it out.

We braved the crowds, with A in tow, and poured through the aisles and aisles of furniture, only to find this guy in the second-to-last row. He was covered in old blue corduroy cushions, so at first glance, he was a little icky. But once I peeled back the cushions, I thought he had some major potential. A cross-back Windsor chair for $30? Sold.


He's cute, right?

As soon as I got him home, I immediately thought of my inspiration picture on Pinterest, that led me looking for a Windsor chair in the first place.

from here

Thought this spot of the playroom would be perfect for a pop of color. I've tried to keep everything in the room black, white or wood, since a lot of A's toys are bright and colorful (loud, also very loud). But this little space near the window is all mine, and I wanted something to distinguish it as its own space. I haven't decided on a color just yet, but these are my two contenders:


But for today, the chair is keeping its beaten-up wood look until I can make a decision.

The whole process of creating a new office space for me isn't going quite as quickly as I've imagined. I just "moved in" while I was home this week, but I still have a lot to do. I find it impossible to know right away how or where certain items should go. I'm more of a trail & error girl. One item I did know for certain I wanted to this space was one of my favorite prints from the Emily Ley Shop. When she had her big clearance event last month, I was frantically trying to order this print, while on the train, before it sold out! I love how it looks in this wood frame.


I'm a perfectionist by nature, so this is something I need to remind myself of daily. Love that this print will have a home right where I'll be doing most of my work for Bella Carta.

And last but not least, I had to share this picture of A. As soon as he sat down in the new chair, he had to show me just how dirty his feet were from playing outside. All boy I tell you, all boy.


I'll be spending a lot of time up in this new office space this week. Lots & lots of new projects for Bella Carta, which makes my heart SO happy. Hope you all have a wonderful week!

4.03.2013

{Project Playroom} Part V: Art Wall

With only a day to spare, we finished the art wall! Since we would be traveling for Easter, we wanted the wall ready when we returned home on Sunday. I mentioned that A's Easter basket was full of art-wall goodies, and what use would they be without a finished space to use them?


Yes, we still have to put the outlet covers back up. Just keeping it real ;)

Now that all the pretty pictures out out of the way, I have to tell you, this wall was the biggest pain in the rear. Seriously, it was the worst DIY-gone-wrong, ever. I thought this would be a 2-day, super simple thing we would tackle after A went to bed. Oh, no no no.

Magnetic primer? SIX coats. No, you read that right. SIX. Do you know how expensive magnetic paint is? $20 for a tiny can. I won't admit how many we used. My husband was super smart before we even put the paint up, and decided we should only do magnetic paint on the center part of this wall. Thank goodness, because after our third trip to Lowe's for magnetic paint, we were seriously rethinking this whole project.

After six coats, we finally felt confident that the chalkboard paint could layer on top and that the magnets would still be able to work. I about had a melt-down once the chalk paint dried: the magnets were sliding down the wall! But after a few hours of pouting, I decided to try again, and they worked! I have no idea why, but if I asked C to put another coat of magnetic primer, I'm pretty sure he would have left me.

We are thrilled it's done, and by A's reaction on Easter Sunday, I'm pretty sure he's loving it, too. He kept repeating "wow! wooooowwwww!". Melt my momma heart.


I'm still hard at work on my new office space in the playroom, but hope to have pictures in the next few weeks. Just ordered my favorite print from the Emily Ley shop; it will be the perfect addition (and inspiration) for my desk.

Linking up with:
Liz Marie Blog 
Uncommon Slice of Surburbia

3.20.2013

{Project Playroom} Part IV: Progress

We are in full-on party planning mode, so the next few weeks we're racing to finish up some house projects. The playroom is at the top of the list, and while it won't be "complete", it will certainly be close.

I don't want to give everything away before we're finished, so instead here are a few sneak peeks at our progress from the weekend.


My new office.


A special project to add some personality to the walls, and honor my sports-crazed hubby.


A little art wall storage for A.


A special addition to the room, with lots of history & significance to our family.


And I can't forget world's cutest helper. I realize that I'm 100% biased, but this kids fascination with all things tool-related blows me away. He just picks up screwdrivers, drills, paint rollers, wrenches - you name it - and knows exactly what to do. We gave him this paint brush & a play paint container, and he was in heaven!


Can't wait to share some new pictures, soon. In the meantime, we'll be upstairs playing (and painting!).

You can see other Project Playroom posts, here:
Current Playroom
Inspiration
The New Rug

3.14.2013

DIY Fabric Covered Cork Board


I'm so excited to show you guys how the playroom is coming together! In the meantime, here's a quick little project I squeezed in last weekend.

I knew I wanted a place to keep our "fun" stuff - birthday invitations & baby announcements, fabric swatches and inspiration for Bella Carta. In my old office, I was just using a standard cork board from Staples from many years ago. It was time for an update, for the new office.

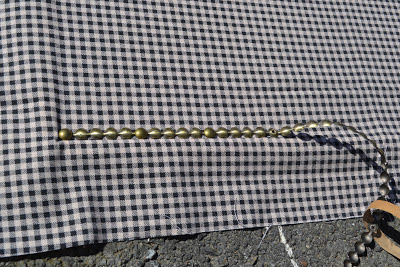
I started out with my very old cork board, adhesive spray, 1/2 a yard of fabric from Joann's ($2.99) and brass nail head trim. The nail head trim was also from Joann's, and with my 40% off coupon, was $12. But since I only used half of it, I'm just going to say it was $6. Ok? Good.

Please ignore the old spray-paint marks on the driveway ;)


 I lightly sprayed the cork board with the adhesive spray, and then lay the fabric on top, making sure to smooth it out as much as I could.


Then I started installing the nail head trim around the edges, until I made it around the inner portion of the frame.


Oh yeah, Otto wanted to help, too!


Once the trim was complete, and I knew the fabric was pulled as tight as it could be, I went ahead and used a staple gun to secure the fabric to the back of the board. Once it was all stapled, I cut all the excess fabric, so that this could sit flush against the wall.


And, that's it! Easy-peasy, right? 15 minutes from start to finish!


I'll be sure to show you where we put it in the new office, as soon as we're ready for the big reveal!

Linking up with 320 Sycamore for Under $10, Under and 1 Hour


And Liz Marie's Inspire Me Linky Party!

1.18.2013

{Project Playroom} Part III: The Rug

A small update to the playroom - our new rug!

LOVE it!


I ordered this rug from Target, but unfortunately, it was a little too big for the space. I couldn't bear to return it, so I brought it to a local rug shop, and they were able to cut it down to size and re-serge it for me. You'd never know by looking at it, and now, it fits perfectly!

If you look closely in the first picture, you will also see a new white filing cabinet. We now have 2 of them, and they will become the base of our new desk. We're making lots of progress in here, and I'm so excited to see the room coming together the way I had envisioned.

Hope to have more updates soon! In the meantime, we'll be playing in the new space!


1.11.2013

{Project Playroom}: Part II / Inspiration

As I shared on Monday, we've started working on our big playroom makeover. Our goal is to have this room function as a playroom, office & guest room - on a budget.

Of course, once we decided this was going to be our next project, I turned to Pinterest for some ideas. You can see the whole board, here, but here are some of my favorites.


Source: bhg.com via Jillian on Pinterest


And finally, here is the mood board I created to keep me on track when shopping for this room. Some of the items you see we already own, but I wanted to make sure they would still work in the new space.

I hope to be back next week sharing some of the progress we've made!

Linking up with Debbie Doo's!

1.07.2013

{Project Playroom}: Part I / Current Playroom

Hi friends!

Welcome to our newest project - Project Playroom!

When we first looked at our home in 2008, the bonus room was a huge selling point. Without a basement, we knew we would need all the extra storage we could get, and this room kind of sold us on the house. Not many split-level homes have this extra space on the 4th floor, so we knew how lucky we were!

Unfortunately I don't have a "before" picture, but suffice it to say this room was a mess. Faux wood paneling, a moss green Berber carpet that had definitely seen better days, and years worth of dust & dirt in every corner. For 2 years, this room served as our attic, until little A (Baby P back then) was about to make his entrance. This room was the last big project before our little guy was born, and we're so SO thankful to have this usable, extra space in our home.

Here is our extra space looks today: part guest room, part playroom, part office, part storage.


I'll be sharing our home goals soon, but we have some big plans for this room in the new year!

Our goal is to turn this space into a true playroom for our little guy, and a permanent office for both me & C. While our office needs are different, we thought it would be best to share this space. I currently work at small desk in our guestroom, and it truly is perfect for me. But since we hope to turn that room into another nursery (one day!), we figured it would be easier to make the transition now while we are reworking the space upstairs. This space will also continue to function as a guest room, since much of our family, and almost all of our friends, live out of town.

Here is our project list - we can't wait to get started!

Playspace:
• find a new, plush (kid-friendly) rug
• add an additional large basket for toy storage
• replace blue bins on 2nd shelf
• child proof TV with anti-tip brackets
• create an art area (maybe a chalkboard & a rotating gallery for A's artwork)
• add a gate at the top of the stairs
• find a way to keep toys organized, and easy-to-find

Office:
• create/build a two-person desk in the dormer
• add shelving for storage
• make a functional/fun message station for reminders & invitations
• find 2 desk chairs
• create a functional filing system for household paperwork

Guest Space:
• add wall-mounted sconces near the bed
• update bedding
• add throw pillows along wall

Also...
• add/make window treatments
• build a closet door for small storage space
• add a closet rod to small space for off-season jackets
• add artwork to stairway

I'll be sharing my Pinterest inspiration & a mood board, soon. Seeing it makes me even more excited about this space!